Table of Contents
In a post-Covid world, Zoom has become part of everyday life. People, ranging from teachers and employers to students and small businesses, have had to adapt and learn new professional best practices to ensure things continue like normal. However, not everyone has learned how to use Zoom and take advantage of its features! Here we’ll break everything down to help you maximize Zoom for all your needs.
Fast Facts
- You do NOT need an account to use Zoom!
- You can use Zoom on both a computer and a mobile device
- Zoom is free to use, but there are paid options for more features!
- With an account, you can personalize Zoom calls to your taste
Finding The App
The first step to using Zoom is downloading the app! Look below to see how to do this both on a computer and a phone/mobile device.
FOR A COMPUTER
From a computer you can either log into zoom directly from a browser or download the app onto your computer!
To Download The Desktop App
- Go to https://zoom.us/download and from the Download Center, click on the Download button under “Zoom Client For Meetings.”
- Once the download is complete, proceed with installing the Zoom application onto your computer.
- You’ll have the option to keep Zoom on your desktop screen or toolbar for easy access!
FOR A MOBILE DEVICE
The only way to use Zoom on a mobile device is to download the app.
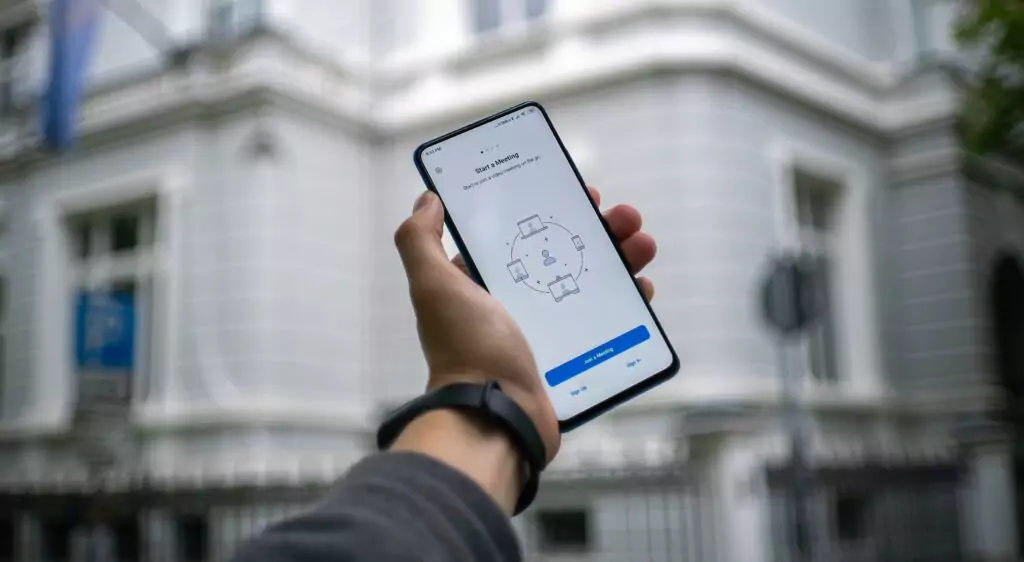
To Download The Mobile App
- Go to the App Store (for iOS) or Google Play (for Android) and download the app. You can find the app by typing “Zoom” into the search bar.
- After the app downloads, click on it. You will see the above screen.
- From here you can create an account, sign into a pre-existing account, or join a scheduled meeting.
Accounts — Do I Need One?
You do not need a Zoom account to use Zoom!
All you need is a link to a meeting, or the meeting ID and password. However, if you would like to host or schedule a meeting on your own and invite participants, as well as personalize settings, you will need an account.
First Time Users
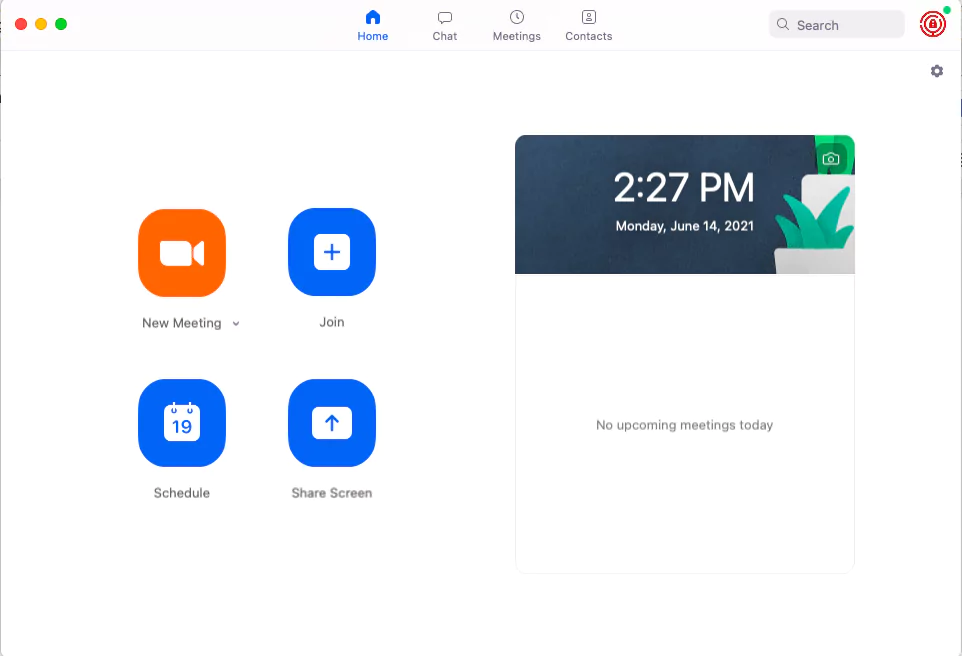
After creating an account, your screen will display the the image on the right.
From here you can join a meeting, schedule a meeting, or start a new instant meeting.
You can also access your contacts list, meeting notes, chat functions, and account settings.
Adjusting Your Settings
To adjust the setting on your account, click the cog in the upper right corner of the Zoom home screen.
From here you can personalize a number of settings, such as your name, screen sharing, background choice, and accessibility settings. The options are endless!
Need To Touch Up Your Appearance?
You can use the HD camera setting, smooth the camera feed to diminish the appearance of any imperfections, and adjust the screen to adapt to low light settings!
Having Audio Issues?
From the settings tab, you can test out your microphone and speakers, choose to use headphones or the computer audio, and specify your mute settings. You can even set your Zoom ringtone!
Filters + Backgrounds
Zoom allows users to use a custom background in order to hide what’s actually going on behind the screen.
This options is perfect for those working from home with kids or other people around!
Using the backgrounds work best against a blank wall. There are also downloadable filters to add a fun, personal touch to videos.
Joining A Meeting
Joining a meeting on Zoom is easy and can be done in multiple ways! For both of these options, you do not need an account, or to be logged in. You simply need access to the Zoom app!
Clicking A Link
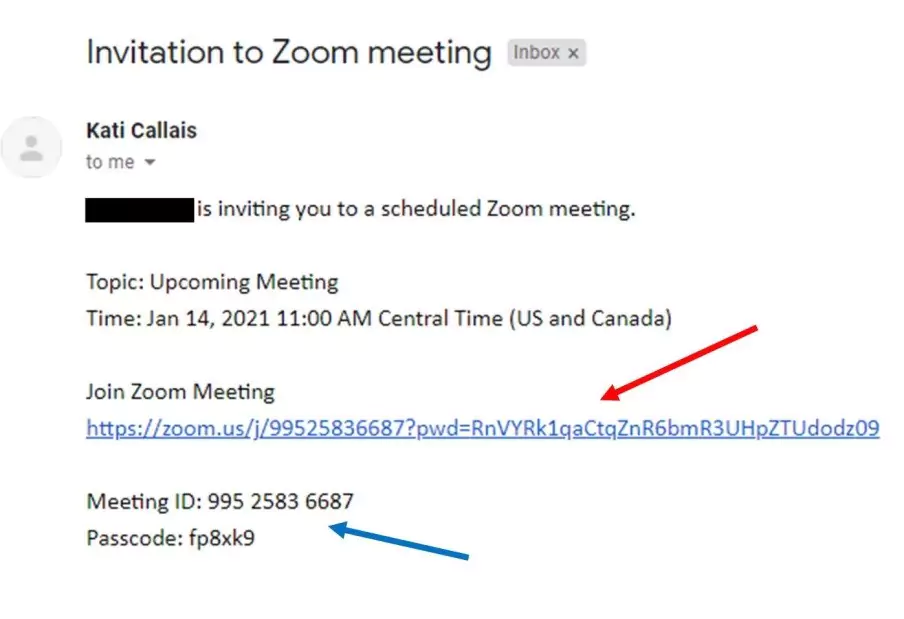
When you’re invited to a meeting, you can simply click the link under “Join Zoom Meeting” and you’ll access the meeting.
Meeting ID
This is a specific numerical code that is sent to participants with the meeting invitation. You can use this to log into a meeting when prompted. It also comes with a passcode.
Scheduling A Meeting
To set up a meeting, you first need to create an account and log in. After that, click “Schedule” and follow the prompts from there!
As Meeting Host, You Can:
- Set the meeting date, time, and length
- Automatically generate a meeting ID number or use a specific ID number
- Determine when users can join a call
- Allow participants to share their screens in a meeting
- Choose which calendar the event gets automatically scheduled to
- Determine group audio settings
- Pick breakout room groups
- Choose whether or not hosts and participants have access to a video feed
Get Your Free Game
The 3-Minute Non-Cringey Ice Breaker for Your Next Meeting
A ready-set-go game to run at your next fully remote or hybrid meeting without the hassle or added pressure of developing a team-building exercise yourself. Get it here →
The Chat Feature
In meetings, participants can chat with the entire group or directly with one another.
If you would like, you can save in-meeting chats to your computer either manually or automatically.
If you save the chat locally to your computer, it will save any chats that you can see—those sent directly to you and those sent to everyone in the meeting or webinar.
Reactions + Hand Raising
Emojis and symbols can be used by call participants to provide non-verbal feedback without disrupting the meeting.
An emoji reaction icon appears on the user’s video panel for 10 seconds once used. However, reactions like Raise Hand, Yes, No, and Slow down stay on screen and must be manually removed by either the participant or the host.

In class, these are a great way to alert the teacher that you have a question or something to say. For participants in professional settings, these can be used to cheer on coworkers or express joy about big company news!
Breakout Rooms
Breakout rooms allow hosts to split their meeting up into 50 separate sessions. These rooms are great if you’d like to facilitate a team building activity or allow individuals in smaller departments to discuss a topic concerning the larger group!

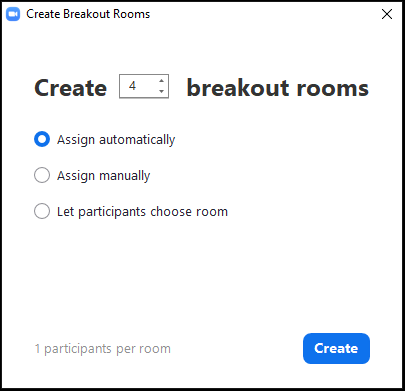
The meeting host can choose to split the participants of the meeting into these separate sessions by using the option along the toolbar at the bottom of the screen.
Hosts can have users split into different rooms automatically, manually, or they can allow participants to select and enter breakout sessions as they please. The host can switch between sessions at any time.
Photo Source: University of Illinois
Recording
Zoom videos are not automatically recorded, but meeting hosts can choose to record and save them without participants’ consent. However, participants do receive a notification when a host starts to record. Recording a sessions could be particularly useful for teachers and professors who would like to give their students the ability to hear lessons and lectures again.
Pricing
Zoom is available free of charge to anyone and the free version offers all the features most users will need! Free Zoom offers and supports:
- Video conferencing for up to 100 participants
- Chat functions
- Virtual backgrounds
- Unlimited one-on-one meetings
- Screen sharing
- A 40-minute meeting length, at which point attendees are ejected from the call. However, the host can simply start another call and participants can dial back in.
The paid version of Zoom extends the time limit for group video conferences to 24 hours and also allows the host to record meetings to the cloud or an on-device storage and schedule repeat meetings. Learn more about Zoom’s pricing plans.
Virtual Escape Rooms
One of the most distinct uses for Zoom calls is virtual team building. Virtual team building gives remote teams the opportunity to bond and connect with each other, even from a distance.
Virtual escape rooms from Team Building Hub allow teams to create memorable experiences with friends and family, no matter where you’re all located. These online adventures are real escape rooms you can play from your home or office over Zoom! All games are live and hosted by a Game Guide. With our virtual escape room experiences, you can laugh, problem-solve, and work together as you make your way through one of our challenging adventures! Find other virtual escape room options here.
Split Screen
Virtual escape rooms work best when players utilize split screens on their computers. That way you can see the live escape room video feed and your team on Zoom all at once. However, split screens are useful for various Zoom scenarios, not just online escape rooms!
To Utilize Split Screens: On A Mac
- Click and hold down on the green circle in the upper left corner of your browser window
- Click on “Tile Window to ___ of Screen.” You can choose whether the window appears on the left or the right of your screen.
- Then click on the other active browser window you would like to appear on the opposite side of the screen.
To Utilize Split Screens: On A PC
- Click and hold down on the title bar of your browser window
- Drag the window all the way to either the left side of the screen. Once the window can no longer move, release the mouse.
- Other active browser windows will appear on the opposite side of the screen. Click the one you would like to see in split-screen view.
Want to do team building activities on Zoom? Here are some options!
- Online Zoom Games
- Zoom Icebreakers for Large Groups
- Virtual Company Celebrations
- Virtual Awards Ceremony

Anecia is a Nashville-based writer who believes in the power of team building. She writes a variety of content focused on creative corporate team building ideas, to help teams become more dynamic, unified, and successful.

